Connect your AI assistant
Requestify runs a Model Context Protocol (MCP) server. Connect your AI assistant to it and the assistant can do what you’d otherwise do in the web app: create endpoints, build mocks or import them from a spec, send test requests, and read the requests that arrived. You ask in plain language and the assistant picks the tools.
The verify loop
Section titled “The verify loop”The most useful thing an assistant can do with Requestify is check its own work. Instead of guessing whether the code it just wrote sends the right request, it runs a short loop:
- Mock. It creates an endpoint, usually a scratch endpoint, and adds mocks for the API your code calls, with the status, body, rules and delays it needs. That includes awkward cases such as a 402 or a slow response.
- Run. It points your code or tests at the endpoint’s URL and runs them, or uses
send_requestto call the endpoint directly and read the full response. - Verify. It calls
wait_for_event, orlist_eventsandget_event, to read what really arrived: method, path, headers, query parameters and body. If proxy is on,get_proxy_responseadds what your server answered. The assistant compares all of this to what it meant to send and fixes the code if they differ.
Requestify records requests and serves mocks; the assistant itself runs your code in its own environment. For the loop to work, your code must be able to use a configurable base URL, so the assistant can point it at the endpoint.
A prompt that triggers the loop:
Mock
POST /v1/chargeson a scratch endpoint so it returns a 402. Run the checkout tests against it, then tell me which headers our code sent to the payment API.
What you need
Section titled “What you need”Any MCP client that supports remote servers over HTTP works, including Claude Code, Claude Desktop, Kiro, Cursor, VS Code and Windsurf. You need:
- The server URL:
https://api.requestify.dev/mcp/. It uses the Streamable HTTP transport. - A way to sign in. Either of these:
- Browser sign-in (OAuth). Most clients discover it automatically: the first time they connect, they open a browser page where you sign in to Requestify and click Allow. There’s no key to copy or store.
- An API key, sent as
Authorization: Bearer rqstfy_…, for clients that can’t sign in through the browser or for unattended use. See API keys.
Example: Claude Code
Section titled “Example: Claude Code”-
Add Requestify as a remote HTTP server:
Terminal window claude mcp add --transport http requestify https://api.requestify.dev/mcp/ -
Start Claude Code and run
/mcp. Requestify is listed as needing authentication. Select it and sign in. You can also sign in from your shell withclaude mcp login requestify. -
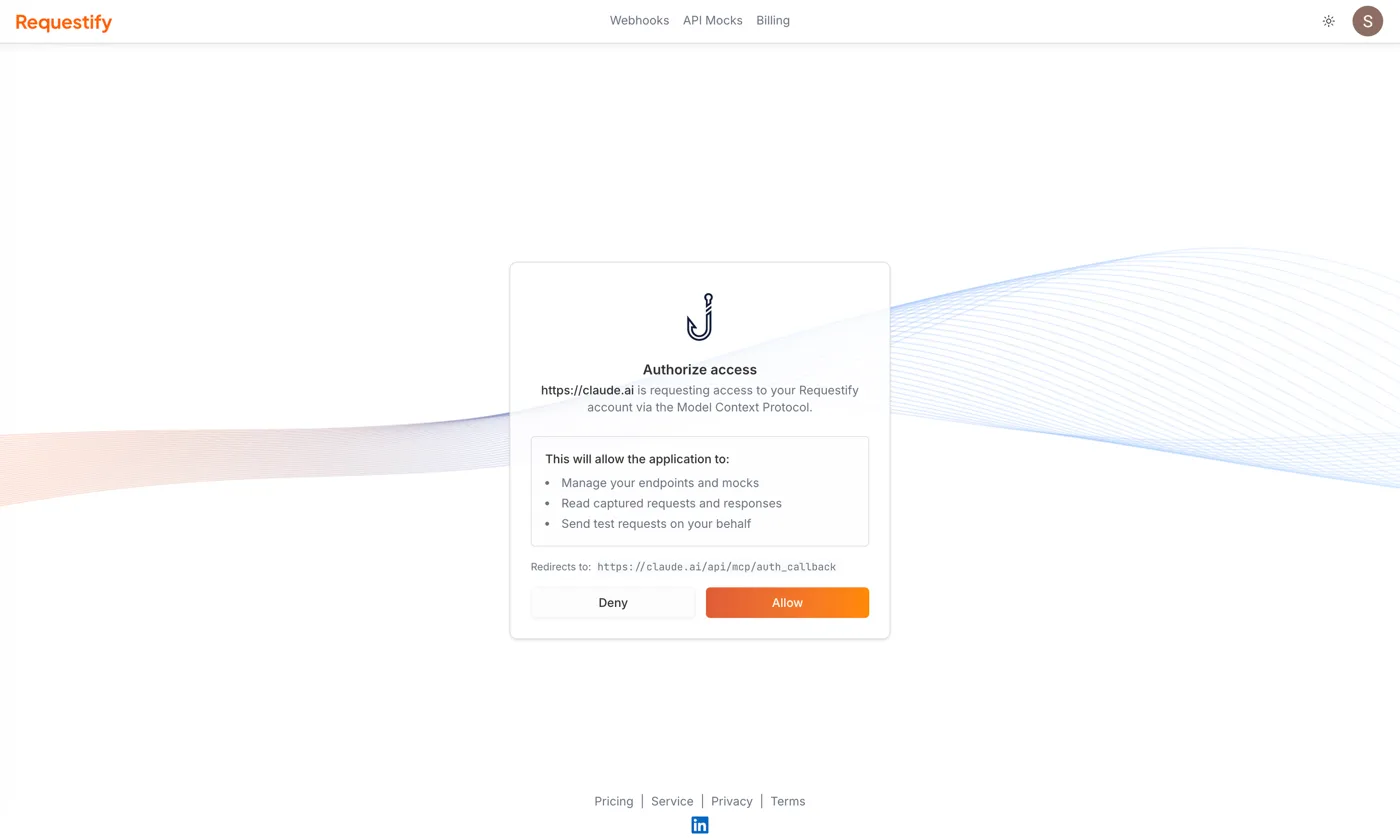
A browser tab opens. Sign in with Google or GitHub if you aren’t already, check what’s being requested, and click Allow.
The page names the application that is asking and the address it will return to, so what you see depends on your client. The example below is from Claude on the web.
-
Back in your terminal, confirm the connection:
Terminal window claude mcp listRequestify should show as connected.
That’s it. Try asking Claude: “Create a scratch Requestify endpoint, add a mock for GET /health
that returns 200 with {"ok": true}, then call it and show me the response.”
Using an API key instead
Section titled “Using an API key instead”To connect with a key rather than browser sign-in, pass it as a header when adding the server:
claude mcp add --transport http requestify https://api.requestify.dev/mcp/ \ --header "Authorization: Bearer rqstfy_your_key_here"If you write the configuration as JSON instead, for example in a project’s .mcp.json, give the
entry "type": "http". Claude Code treats an entry without a type as a local server.
{ "mcpServers": { "requestify": { "type": "http", "url": "https://api.requestify.dev/mcp/", "headers": { "Authorization": "Bearer ${REQUESTIFY_API_KEY}" } } }}${REQUESTIFY_API_KEY} is read from your environment, which keeps the key out of the file.
Other clients
Section titled “Other clients”The steps are the same everywhere, only the settings screen differs:
- Add a remote MCP server with the URL
https://api.requestify.dev/mcp/. If the client asks for a transport, choose HTTP or Streamable HTTP. - Connect. If the client supports OAuth, it opens the Requestify sign-in page; click Allow.
Otherwise, add the header
Authorization: Bearer rqstfy_…with an API key.
Check your client’s MCP documentation for where server settings live. The Download mcp.json
button on the API Keys page produces a file in the common mcpServers
format, with your key filled in.
What the assistant can do
Section titled “What the assistant can do”The assistant sees the same workspace and plan limits as you do in the web app. Requestify gives it these tools:
-
Endpoints:
create_endpoint,list_endpoints,update_endpointanddelete_endpoint. Updating covers proxy, the auth header and turning mocks on. -
Requests:
send_requestsends a request to one of your endpoints and returns the full response.wait_for_eventwaits for the next request to arrive, which is how an assistant tests a webhook: trigger the sender, then wait.list_events,get_eventandget_proxy_responseread what was captured and what your server answered. -
Mocks:
create_mock,list_mocks,get_mock,update_mockanddelete_mock, with the same paths, templates, rules and delays as the web app. -
OpenAPI to mocks:
stage_openapiuploads a spec without pasting it into the conversation,analyze_openapilists what it would create and what already exists,import_openapicreates the mocks, andexport_openapidownloads an endpoint’s mocks as a spec. -
Spec editing:
upload_spec,inspect_spec,search_spec_operations,search_spec_components,describe_spec,validate_spec,edit_spec,diff_specanddownload_speclet an assistant explore, validate, change and compare an OpenAPI document, even a large one, without reading it all into the conversation. Uploaded specs are kept for 24 hours.
Scratch endpoints
Section titled “Scratch endpoints”When an assistant needs an endpoint just for a test, it can create a scratch endpoint. Scratch endpoints expire after 24 hours and don’t count toward your plan’s endpoint limit, so experiments don’t crowd out your real endpoints. Up to three can exist at once.
Things to ask
Section titled “Things to ask”- “Import the OpenAPI spec at ./openapi.yaml into a new Requestify endpoint and turn on mocks.”
- “Make GET /v1/users/
{id}on my checkout-mocks endpoint return 404 when the X-Scenario header is missing.” - “I’m going to trigger a Stripe test webhook. Wait for it on my stripe endpoint and tell me which fields the payload has.”
- “Add a 3-second delay to the POST /payments mock so I can test our timeout handling.”
- “Show me the last five requests to my endpoint and anything unusual in their headers.”
- “Export the mocks on my orders endpoint as a clean OpenAPI spec and save it to docs/api.yaml.”
Troubleshooting
Section titled “Troubleshooting”-
The client says Requestify needs authentication: Complete the browser sign-in. In Claude Code, run
/mcpand select Requestify. If you signed in before and it stopped working, sign in again from the same place. -
The connection fails when using an API key: The key may be mistyped, expired or revoked; check it on the API Keys page and create a new one if needed. Make sure it’s sent as
Authorization: Bearer …, which is the only form the MCP server accepts. In Claude Code, a configured header that’s rejected isn’t replaced by browser sign-in; remove the header to use sign-in instead. -
The assistant works in an unexpected workspace: It acts as whichever account approved the sign-in, or whichever account created the key. Sign out of other accounts in your browser before approving, or use a key from the right account.
-
The assistant hits a limit: Endpoints and mocks per endpoint are limited by plan, the same as in the web app. Ask the assistant to use a scratch endpoint for experiments, delete what it no longer needs, or see pricing.